Setup Walkthrough
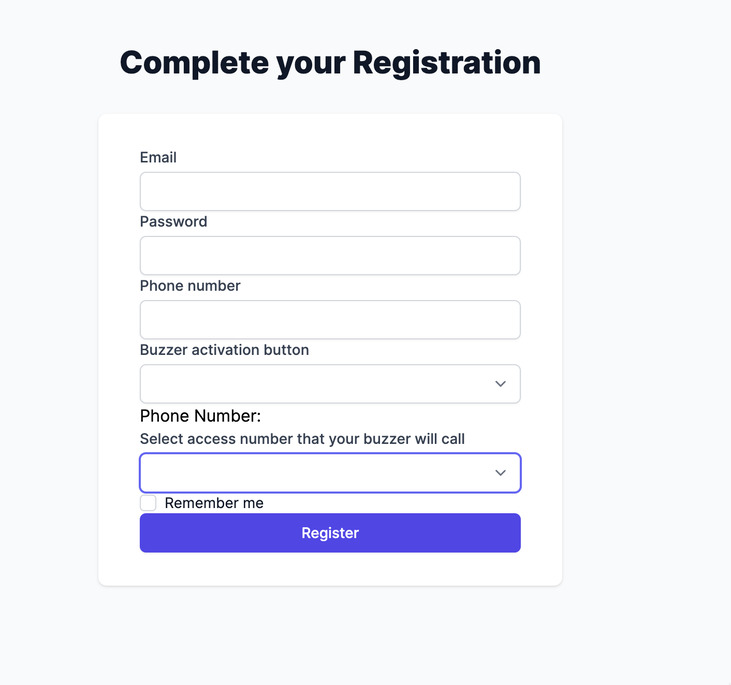
When you click start your 30 day free trial, you'll be taken to a registration page, where we collect only the information required to deliver the service to you. The Access Number that you select here will be the number you give to your building for input into the buzzer system. The buzzer activation button is whatever key you currently press on your cell phone to unlock the door when buzzed.
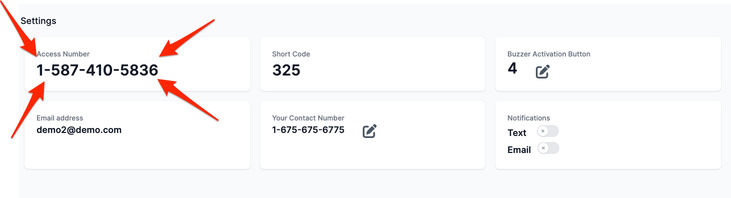
Once you have logged into the platform (mobile or desktop), the most important thing you need to do is to have your building manager switch the phone number that the buzzer calls to the one shown in your account dashboard settings.
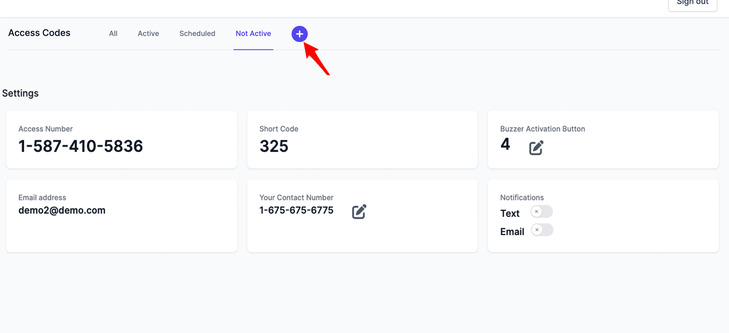
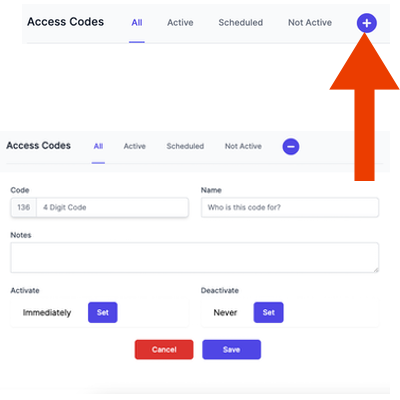
Once your building manager has made the change, then you can start creating access codes. This is done by hitting the plus sign button
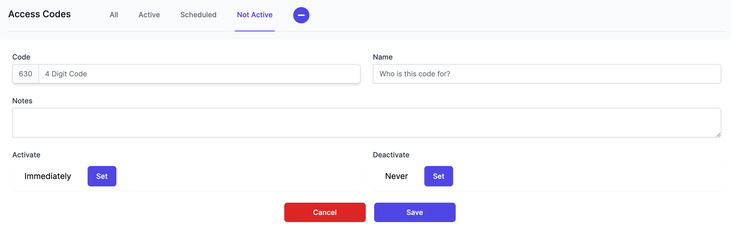
When you create new codes they are active by default with no end date. You can select both activation and deactivation dates and times, and you can change these anytime after making a code.
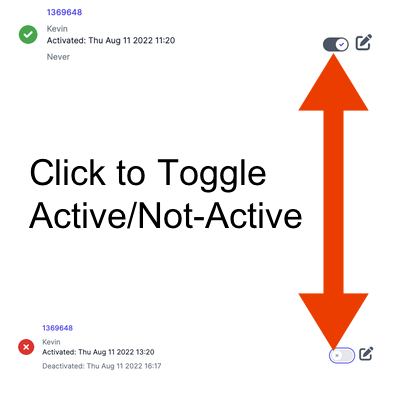
Once you have some codes created, you can toggle them on and off whenever you want to.

Now you can provide the codes to your guests, friends, family, cleaners... When a guest buzzes your unit, they will be asked to enter their access code on the keypad, if the code is valid and (active) then Buzzer Boss will push the unlock number that you selected to automatically unlock the door.

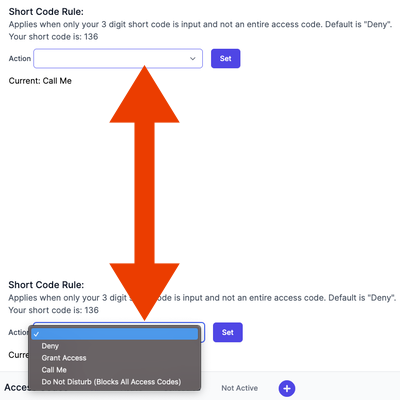
You have the option to select a Short Code Rule. If someone buzzes your unit and enters just the 3 digit Short Code a default action can happen. This is great for deliveries, cleaners, and others who need frequent access. Only Standard and Pro users, or users on the 30 day free trial can set the Grant Access action.

Feature Tour
Create a new Access Code
Click the "Plus" sign in the Access Codes Header
The new access code form will be shown. Enter a unique 4 digit code and hit the "Save" button
Note: The "Name" and "Notes" fields are optional, you can use them to help keep track of your Access Codes.
1 of 9
Edit Access Code
Click the "Edit" icon for the Access Code you want to edit.
The Edit form will be expanded. You can change the "Name", "Notes", and Schedule for an access code.
To delete an access code press the "Delete" button.
Note: The code itself cannot be changed.

2 of 9
Toggle Access Code Active/Not Active
To turn an Active Access Code off, simply click the toggle. The Green Check to the left of the code will turn into a Red X to show that the code is Not Active
To turn a Not Active Access Code on, simply click the toggle. The Red X to the left of the code will turn into a Green Check to show that the code is Active
3 of 9
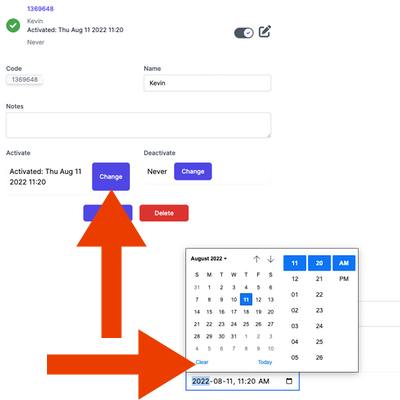
Schedule Activation
If you want an access code to be Active in the future, but not the present then you can Schedule Activation by clicking the "Change" button in either the Create Access Code form or the Edit Access Code form.
Then put the time and date that you want the Access Code to Activate and click the "Save" button.
The Access Code will not work until the date and time, then it will become Active without any further actions from you.
4 of 9
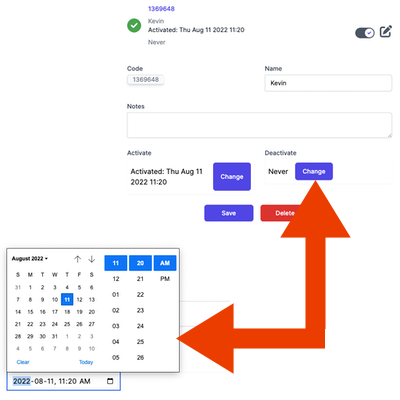
Schedule Deactivation
To have an Access Code deactivate, you can click the "Change" button in either the Create Access Code form or the Edit Access Code form.
By default Access Codes stay Active until you turn them off. By scheduling deactivation you can control when a Code turns off.
5 of 9
Short Code Rules
Short Code Rules are handy for managing deliveries, or friends.
The options are: Grant Access (which opens the door), Deny (which does NOT open the door), Call Me (which forwards the call to your phone number, just like the normal buzzer would), and Do Not Disturb (which blocks ALL access codes)
The Short Code Rule applies when someone buzzes your unit and then enters your 3 digit Short Code.
6 of 9
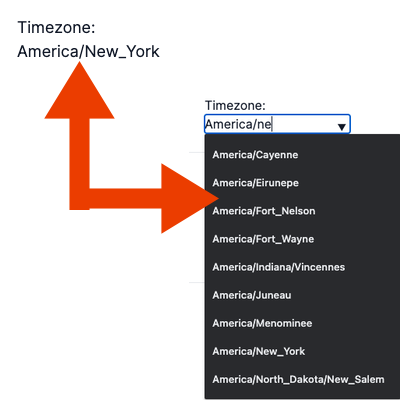
Timezone
The Timezone setting can be seen in the top left corner of the dashboard page. This timezone is initially set by your browser, but if your property is in a different time zone then it is very easy to change.
To change the timezone just click on the zone itself and start typing in the timezone name that you want to use. There will be a dropdown with options. Select the timezone you want and hit enter.
This timezone is used for displaying the date and time for Scheduling options like Activation and Deactivation of codes.
7 of 9
Buzzer Activation Button
This setting can be found in the "Settings" section at the bottom of the dashboard.
The Buzzer Activation Button is the button that our server will press in order to grant access to your building.
This should be set to the button that you currently press on your phone to let someone into your building.
To change the button, click on the "Edit" icon and select the correct button from the dropdown.

8 of 9
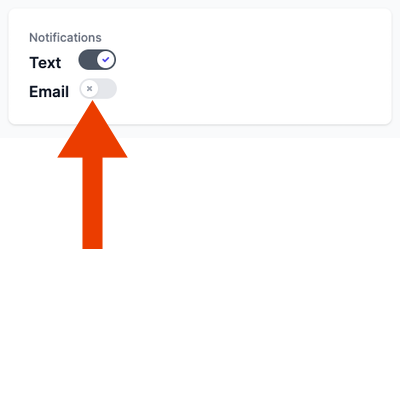
Notifications
This setting can be found in the "Settings" section at the bottom of the dashboard.
To change your preferences simply click the toggle next to the notification type that you want to change.
9 of 9
-
We want you to fall in love with Buzzer Boss, so we've decided that everyone will get full access to all features during the 30 day free trial. Anytime within those 30 days you can choose a plan that fits your needs, with the features that you actually use.
-
Access Codes are 7 digit codes that can be used to gain access to a building. The code consists of a 3 digit prefix and a 4 digit user chosen code.
-
The 3 digit Short Code is assigned to each user when their account is created. It cannot be changed. This prefix is added to the front of every code that a user creates and along with the Access Number called is used to identify a user when a code is input in a buzzer system. This way the system can provide the correct response. The use of prefixes is how we can allow multiple users to utilize the same Access Number
-
An Access Number is the phone number that a user gives to their building manager to have their Buzzer System call. For most users it will replace their cell number in the Buzzer System. This is the number that is called when someone buzzes the user.
-
We guarantee that you will be able to have a minimum of 500 active users per Access Number.
-
The Access Numbers are owned by you, when you direct a user to the registration page you have the option of choosing an access number for them, or allowing them to select from any of your available numbers. The Access Number is clearly displayed in the User Dashboard.
-
No, a User account supports only one location at a time. If a user wants to have multiple locations then they will need multiple accounts. We hope to offer multiple locations in a future update.
-
Users with the Basic User plan can have a maximum of 10 Access Codes at any time. These Access Codes could be active or inactive. If a user wants to add a new Access Code after they've reached the limit, they can delete an old code and then make a new one.
-
Standard and Pro Users can turn on/off notifications in their User Dashboard, and Pro Users can also turn on/off Text message notifications. Currently a notification will be sent on every Access Code use and the Grant Access and Deny Special Rules if notifications are turned on. We are continually working on improving the system, and more granular control of notifications will be available in a future update.
-
Special Rules are conveniences that are available when someone inputs just the 3 digit Short Code. The Special Rules consist of Grant Access which opens the door immediately on recieving the 3 digit Short Code, Call Me which forwards the buzzer call to the user's phone number allowing them to talk to the person and choose to buzz them in or not, and Deny which will not grant access on a 3 digit Short Code.
-
We provide a toggle that allows a user to Deny All access via their buzzer regardless of Access Code use. This provides added comfort and security to users by providing total control over their system.
-
Users can add a specific date and time for Access Codes to become Activated, and a separate date and time for the code to become Deactivated. Activation/Deactivation are independent, a code does not need one scheduled for the other to work. The schedule can be added at the time of code creation, or it can be added/changed by editing the Access Code
-
We've worked hard to minimize the setup for Users. All that your new customer needs to do is give the Access Number (found in their User Dashboard) to their building manager to have set as the number that the buzzer system calls. Once that is done then everything is ready for them to start creating Access Codes and Special rules, there are no other setup steps for Users.
-
No. Our system relies on the buzzer system calling a phone number when a unit is buzzed. Systems that do not make phone calls are not compatible. Most buzzer systems in use today utilize the phone network to operate, however some older buildings may still use a hard-wired intercom.
-
It depends, some buildings and systems allow for long-distance numbers while others do not and require a local number. When you sign up as a partner with a White Label account you are able to choose your Access Numbers so that you have numbers in the cities and regions where your customers are located.